https://www.tutorialspoint.com/ms_sql_server/ms_sql_server_quick_guide.htm
MS SQL Server - Overview
This chapter introduces SQL Server, discusses its usage, advantages, versions, and components.
What is SQL Server?
- It is a software, developed by Microsoft, which is implemented from the specification of RDBMS.
- It is also an ORDBMS.
- It is platform dependent.
- It is both GUI and command based software.
- It supports SQL (SEQUEL) language which is an IBM product, non-procedural, common database and case insensitive language.
Usage of SQL Server
- To create databases.
- To maintain databases.
- To analyze the data through SQL Server Analysis Services (SSAS).
- To generate reports through SQL Server Reporting Services (SSRS).
- To carry out ETL operations through SQL Server Integration Services (SSIS).
Versions of SQL Server
| Version |
Year |
Code Name |
| 6.0 |
1995 |
SQL95 |
| 6.5 |
1996 |
Hydra |
| 7.0 |
1998 |
Sphinx |
| 8.0 (2000) |
2000 |
Shiloh |
| 9.0 (2005) |
2005 |
Yukon |
| 10.0 (2008) |
2008 |
Katmai |
| 10.5 (2008 R2) |
2010 |
Kilimanjaro |
| 11.0 (2012) |
2012 |
Denali |
| 12 (2014) |
2014 |
Hekaton (initially), SQL 14 (current) |
SQL Server Components
SQL Server works in client-server architecture, hence it supports two types of components − (a) Workstation and (b) Server.
- Workstation components are installed in every device/SQL
Server operator’s machine. These are just interfaces to interact with
Server components. Example: SSMS, SSCM, Profiler, BIDS, SQLEM etc.
- Server components are installed in centralized server.
These are services. Example: SQL Server, SQL Server Agent, SSIS, SSAS,
SSRS, SQL browser, SQL Server full text search etc.
Instance of SQL Server
- An instance is an installation of SQL Server.
- An instance is an exact copy of the same software.
- If we install 'n' times, then 'n' instances will be created.
- There are two types of instances in SQL Server a) Default b) Named.
- Only one default instance will be supported in one Server.
- Multiple named instances will be supported in one Server.
- Default instance will take the server name as Instance name.
- Default instance service name is MSSQLSERVER.
- 16 instances will be supported in 2000 version.
- 50 instances will supported in 2005 and later versions.
Advantages of Instances
- To install different versions in one machine.
- To reduce cost.
- To maintain production, development, and test environments separately.
- To reduce temporary database problems.
- To separate security privileges.
- To maintain standby server.
MS SQL Server - Editions
SQL Server is available in various editions. This chapter lists the multiple editions with its features.
- Enterprise − This is the top-end edition with a full feature set.
- Standard − This has less features than Enterprise, when there is no requirement of advanced features.
- Workgroup − This is suitable for remote offices of a larger company.
- Web − This is designed for web applications.
- Developer − This is similar to Enterprise, but licensed to
only one user for development, testing and demo. It can be easily
upgraded to Enterprise without reinstallation.
- Express − This is free entry level database. It can utilize only 1 CPU and 1 GB memory, the maximum size of the database is 10 GB.
- Compact − This is free embedded database for mobile application development. The maximum size of the database is 4 GB.
- Datacenter − The major change in new SQL Server 2008 R2 is
Datacenter Edition. The Datacenter edition has no memory limitation and
offers support for more than 25 instances.
- Business Intelligence − Business Intelligence Edition is a
new introduction in SQL Server 2012. This edition includes all the
features in the Standard edition and support for advanced BI features
such as Power View and PowerPivot, but it lacks support for advanced
availability features like AlwaysOn Availability Groups and other online
operations.
- Enterprise Evaluation − The SQL Server Evaluation Edition
is a great way to get a fully functional and free instance of SQL Server
for learning and developing solutions. This edition has a built-in
expiry of 6 months from the time that you install it.
| 2005 |
2008 |
2008 R2 |
2012 |
2014 |
| Enterprise |
Yes |
Yes |
Yes |
Yes |
| Standard |
Yes |
Yes |
Yes |
Yes |
| Developer |
Yes |
Yes |
Yes |
Yes |
| Workgroup |
Yes |
Yes |
No |
No |
| Win Compact Edition - Mobile |
Yes |
Yes |
Yes |
Yes |
| Enterprise Evaluation |
Yes |
Yes |
Yes |
Yes |
| Express |
Yes |
Yes |
Yes |
Yes |
| Web |
Yes |
Yes |
Yes |
|
| Datacenter |
No |
No |
|
|
| Business Intelligence |
Yes |
|
|
|
MS SQL Server - Installation
SQL Server supports two types of installation −
Checks
- Check RDP access for the server.
- Check OS bit, IP, domain of server.
- Check if your account is in admin group to run setup.exe file.
- Software location.
Requirements
- Which version, edition, SP and hotfix if any.
- Service accounts for database engine, agent, SSAS, SSIS, SSRS, if any.
- Named instance name if any.
- Location for binaries, system, user databases.
- Authentication mode.
- Collation setting.
- List of features.
Pre-requisites for 2005
- Setup support files.
- .net framework 2.0.
- SQL Server native client.
Pre-requisites for 2008&2008R2
- Setup support files.
- .net framework 3.5 SP1.
- SQL Server native client.
- Windows installer 4.5/later version.
Pre-requisites for 2012&2014
- Setup support files.
- .net framework 4.0.
- SQL Server native client.
- Windows installer 4.5/later version.
- Windows PowerShell 2.0.
Installation Steps
Step 1 − Download the Evaluation Edition from
http://www.microsoft.com/download/en/details.aspx?id=29066
Once the software is downloaded, the following files will be available based on your download (32 or 64 bit) option.
ENU\x86\SQLFULL_x86_ENU_Core.box
ENU\x86\SQLFULL_x86_ENU_Install.exe
ENU\x86\SQLFULL_x86_ENU_Lang.box
OR
ENU\x86\SQLFULL_x64_ENU_Core.box
ENU\x86\SQLFULL_x64_ENU_Install.exe
ENU\x86\SQLFULL_x64_ENU_Lang.box
Note − X86 (32 bit) and X64 (64 bit)
Step 2 − Double-click the “SQLFULL_x86_ENU_Install.exe” or
“SQLFULL_x64_ENU_Install.exe”, it will extract the required files for
installation in the“SQLFULL_x86_ENU” or “SQLFULL_x86_ENU” folder
respectively.
Step 3 − Click the “SQLFULL_x86_ENU” or “SQLFULL_x64_ENU_Install.exe” folder and double-click “SETUP” application.
For understanding, here we have used SQLFULL_x64_ENU_Install.exe software.
Step 4 − Once we click on 'setup' application, the following screen will open.
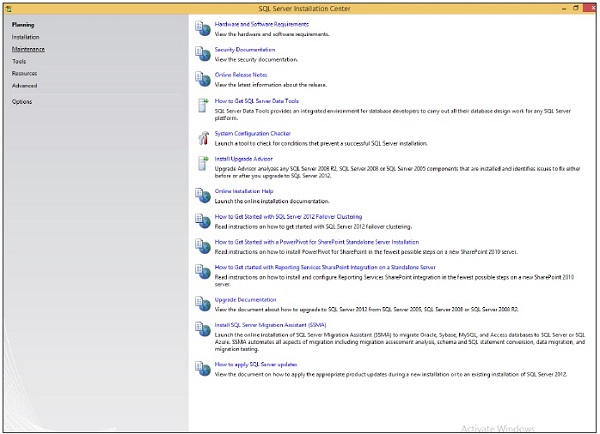 Step 5
 − Click Installation which is on the left side of the above screen.
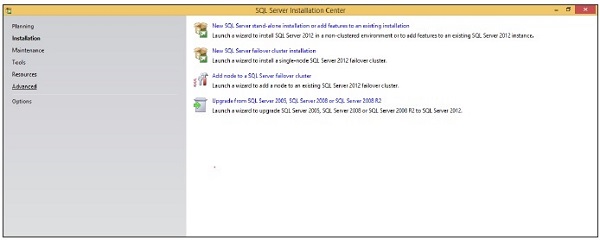 Step 6
 − Click the first option of the right side seen on the above screen. The following screen will open.
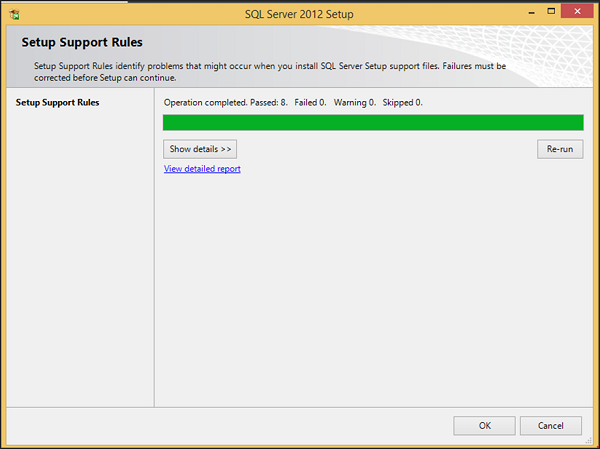 Step 7
 − Click OK and the following screen pops up.
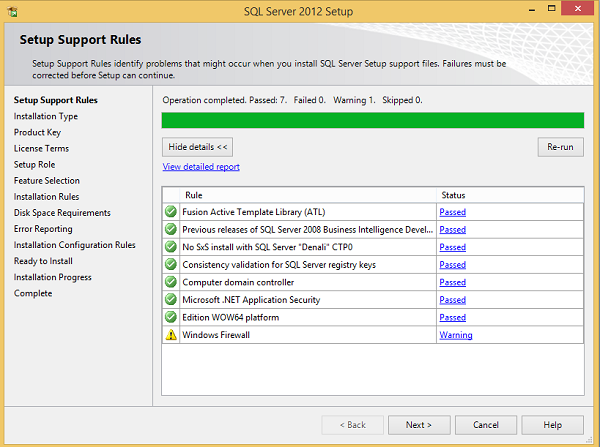 Step 8
 − Click Next to get the following screen.
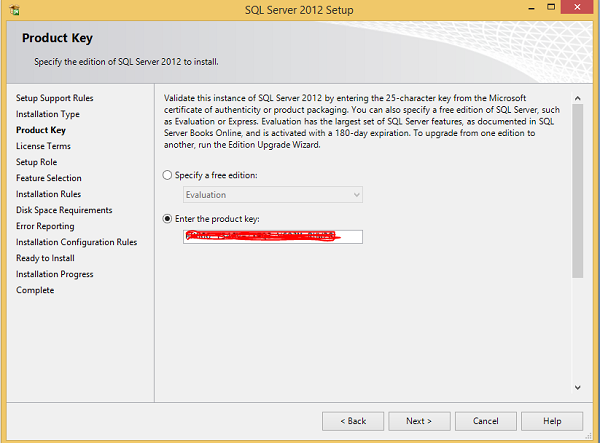 Step 9
 − Make sure to check the product key selection and click Next.
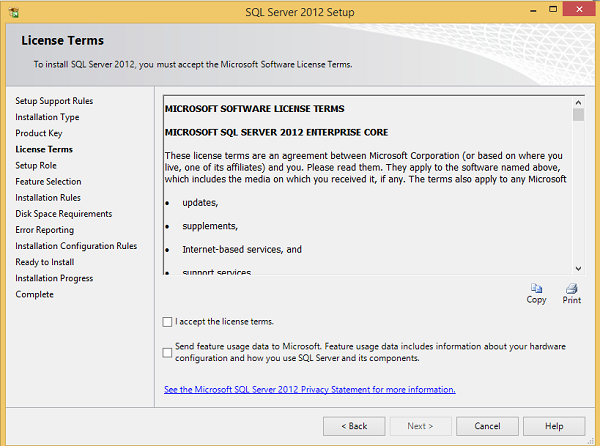 Step 10
 − Select the checkbox to accept the license option and click Next.
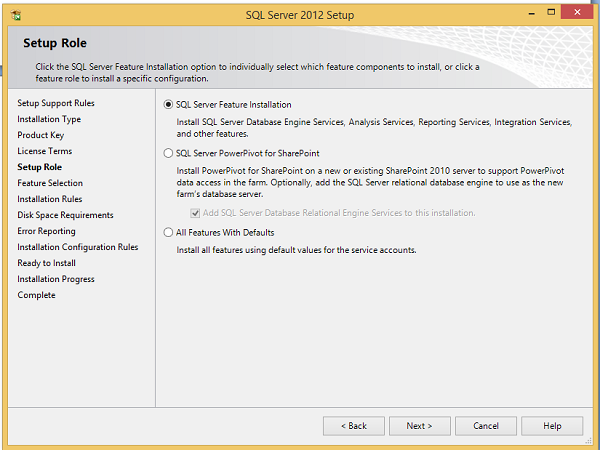 Step 11
 − Select SQL Server feature installation option and click Next.
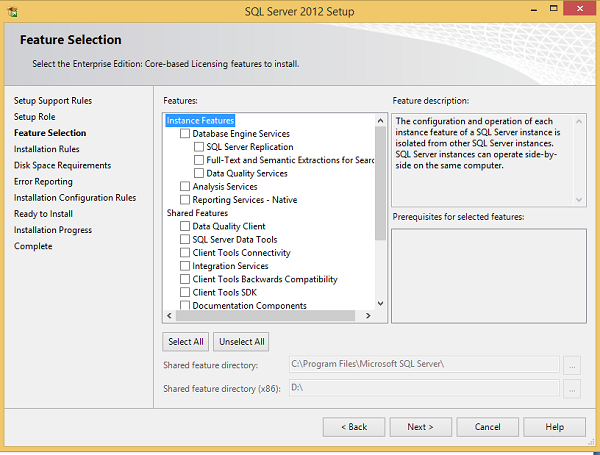 Step 12
 − Select Database engine services checkbox and click Next.
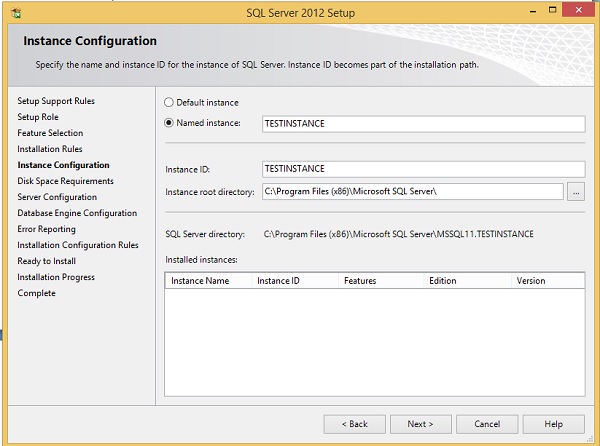 Step 13
 − Enter the named instance (here I used TestInstance) and click Next.
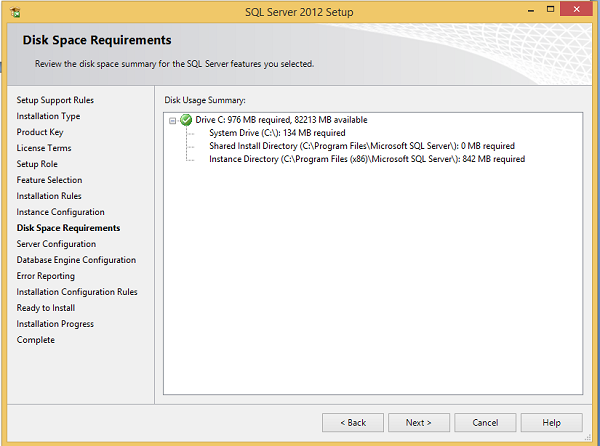 Step 14
 − Click Next on the above screen and the following screen appears.
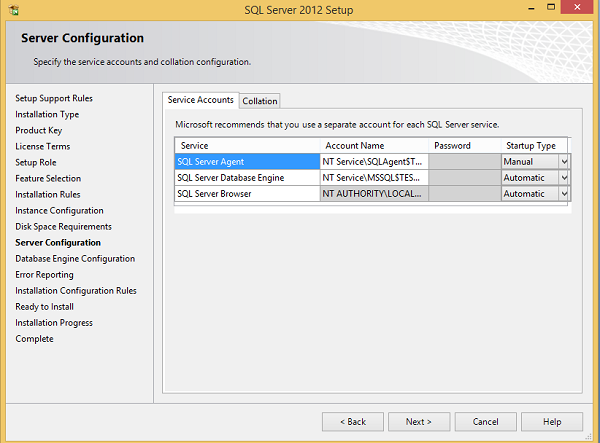 Step 15
 − Select service account names and start-up types for the above listed services and click Collation.
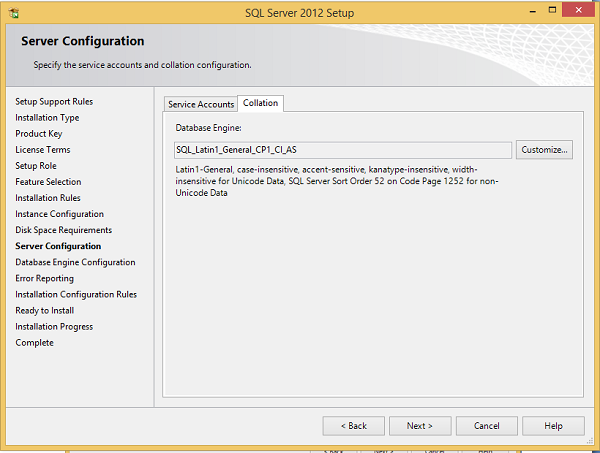 Step 16
 − Make sure the correct collation selection is checked and click Next.
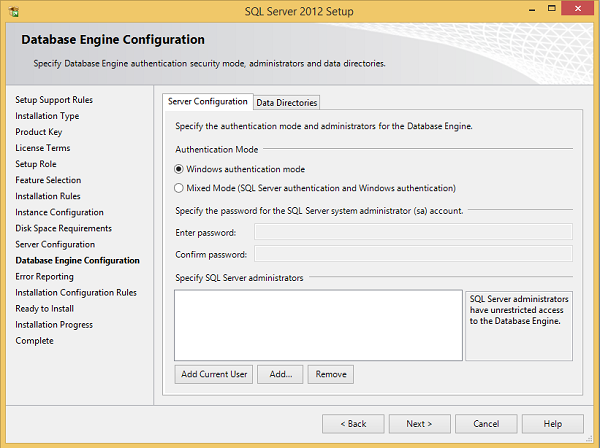 Step 17
 − Make sure authentication mode selection and administrators are checked and click Data Directories.
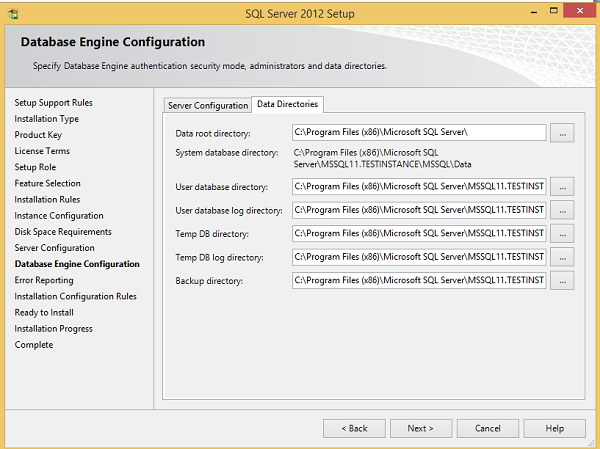 Step 18
 − Make sure to select the above directory locations and click Next. The following screen appears.
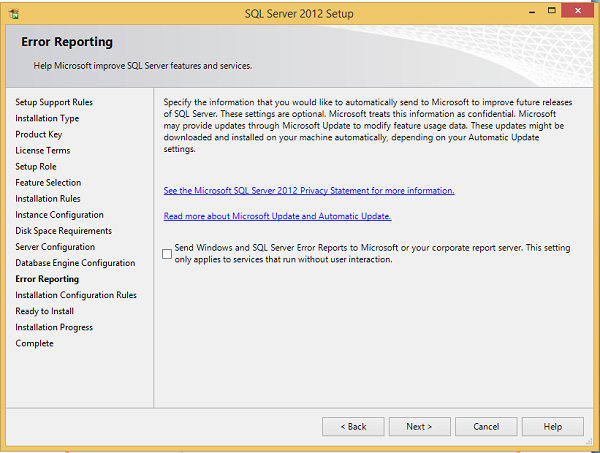 Step 19
 − Click Next on the above screen.
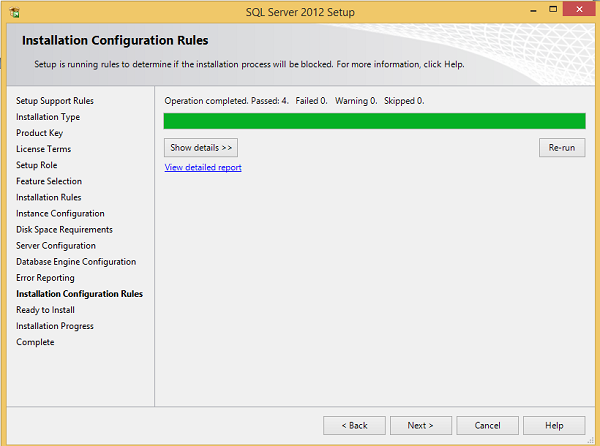 Step 20
 − Click Next on the above screen to the get the following screen.
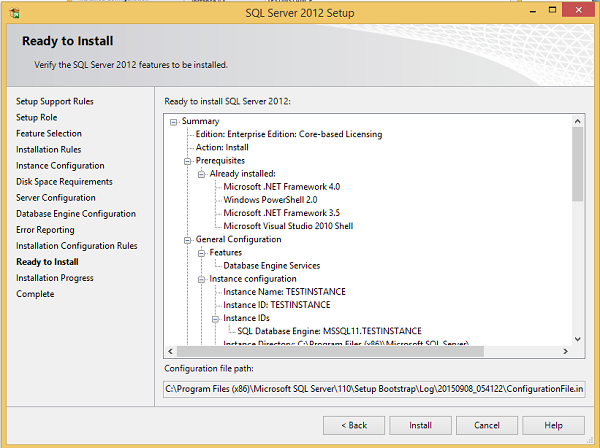 Step 21
 − Make sure to check the above selection correctly and click Install.
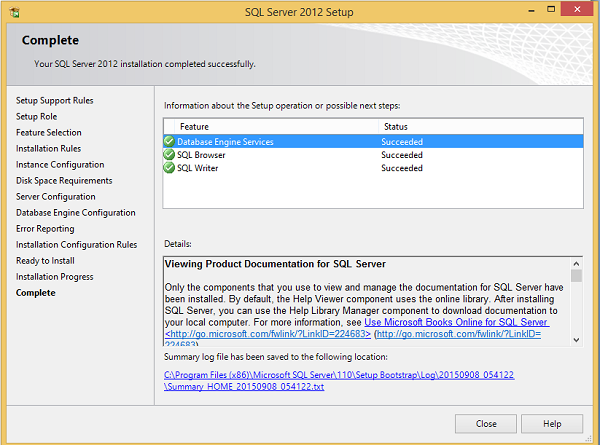
Installation is successful as shown in the above screen. Click Close to finish.
MS SQL Server - Architecture
We have classified the architecture of SQL Server into the following parts for easy understanding −
- General architecture
- Memory architecture
- Data file architecture
- Log file architecture
General Architecture
Client − Where the request initiated.
Query − SQL query which is high level language.
Logical Units − Keywords, expressions and operators, etc.
N/W Packets − Network related code.
Protocols − In SQL Server we have 4 protocols.
- Shared memory (for local connections and troubleshooting purpose).
- Named pipes (for connections which are in LAN connectivity).
- TCP/IP (for connections which are in WAN connectivity).
- VIA-Virtual Interface Adapter (requires special hardware to set up by vendor and also deprecated from SQL 2012 version).
Server − Where SQL Services got installed and databases reside.
Relational Engine − This is where real execution will be done. It contains Query parser, Query optimizer and Query executor.
Query Parser (Command Parser) and Compiler (Translator) − This will check syntax of the query and it will convert the query to machine language.
Query Optimizer − It will prepare the execution plan as output by taking query, statistics and Algebrizer tree as input.
Execution Plan − It is like a roadmap, which contains the order of all the steps to be performed as part of the query execution.
Query Executor − This is where the query will be executed step
by step with the help of execution plan and also the storage engine
will be contacted.
Storage Engine − It is responsible for storage and retrieval
of data on the storage system (disk, SAN, etc.,), data manipulation,
locking and managing transactions.
SQL OS − This lies between the host machine (Windows OS) and
SQL Server. All the activities performed on database engine are taken
care of by SQL OS. SQL OS provides various operating system services,
such as memory management deals with buffer pool, log buffer and
deadlock detection using the blocking and locking structure.
Checkpoint Process − Checkpoint is an internal process that
writes all dirty pages (modified pages) from Buffer Cache to Physical
disk. Apart from this, it also writes the log records from log buffer to
physical file. Writing of Dirty pages from buffer cache to data file is
also known as Hardening of dirty pages.
It is a dedicated process and runs automatically by SQL Server at
specific intervals. SQL Server runs checkpoint process for each database
individually. Checkpoint helps to reduce the recovery time for SQL
Server in the event of unexpected shutdown or system crash\Failure.
Checkpoints in SQL Server
In SQL Server 2012 there are four types of
checkpoints −
- Automatic − This is the most common checkpoint which runs
as a process in the background to make sure SQL Server Database can be
recovered in the time limit defined by the Recovery Interval − Server
Configuration Option.
- Indirect − This is new in SQL Server 2012. This also runs
in the background but to meet a user-specified target recovery time for
the specific database where the option has been configured. Once the
Target_Recovery_Time for a given database has been selected, this will
override the Recovery Interval specified for the server and avoid
automatic checkpoint on such DB.
- Manual − This one runs just like any other T-SQL
statement, once you issue checkpoint command it will run to its
completion. Manual checkpoint runs for your current database only. You
can also specify the Checkpoint_Duration which is optional - this
duration specifies the time in which you want your checkpoint to
complete.
- Internal − As a user you can’t control internal checkpoint. Issued on specific operations such as
- Shutdown initiates a checkpoint operation on all databases except when shutdown is not clean (shutdown with nowait).
- If the recovery model gets changed from Full\Bulk-logged to Simple.
- While taking backup of the database.
- If your DB is in simple recovery model, checkpoint process
executes automatically either when the log becomes 70% full, or based on
Server option-Recovery Interval.
- Alter database command to add or remove a data\log file also initiates a checkpoint.
- Checkpoint also takes place when the recovery model of the DB is bulk-logged and a minimally logged operation is performed.
- DB Snapshot creation.
- Lazy Writer Process − Lazy writer will push dirty pages to
disk for an entirely different reason, because it needs to free up
memory in the buffer pool. This happens when SQL server comes under
memory pressure. As far as I am aware, this is controlled by an internal
process and there is no setting for it.
SQL server constantly monitors memory usage to assess resource
contention (or availability); its job is to make sure that there is a
certain amount of free space available at all times. As part of this
process, when it notices any such resource contention, it triggers Lazy
Writer to free up some pages in memory by writing out dirty pages to
disk. It employs Least Recently Used (LRU) algorithm to decide which
pages are to be flushed to the disk.
If Lazy Writer is always active, it could indicate memory bottleneck.
Memory Architecture
Following are some of the salient features of memory architecture.
- One of the primary design goals of all database software is to
minimize disk I/O because disk reads and writes are among the most
resource-intensive operations.
- Memory in windows can be called with Virtual Address Space,
shared by Kernel mode (OS mode) and User mode (Application like SQL
Server).
- SQL Server "User address space" is broken into two regions: MemToLeave and Buffer Pool.
- Size of MemToLeave (MTL) and Buffer Pool (BPool) is determined by SQL Server during startup.
- Buffer management is a key component in achieving I/O
highly efficiency. The buffer management component consists of two
mechanisms: the buffer manager to access and update database pages, and
the buffer pool to reduce database file I/O.
- The buffer pool is further divided into multiple sections. The
most important ones being the buffer cache (also referred to as data
cache) and procedure cache. Buffer cache holds the data pages in
memory so that frequently accessed data can be retrieved from cache. The
alternative would be reading data pages from the disk. Reading data
pages from cache optimizes performance by minimizing the number of
required I/O operations which are inherently slower than retrieving data
from the memory.
- Procedure cache keeps the stored procedure and query
execution plans to minimize the number of times that query plans have to
be generated. You can find out information about the size and activity
within the procedure cache using DBCC PROCCACHE statement.
Other portions of buffer pool include −
- System level data structures − Holds SQL Server instance level data about databases and locks.
- Log cache − Reserved for reading and writing transaction log pages.
- Connection context − Each connection to the instance has a
small area of memory to record the current state of the connection.
This information includes stored procedure and user-defined function
parameters, cursor positions and more.
- Stack space − Windows allocates stack space for each thread started by SQL Server.
Data File Architecture
Data File architecture has the following components −
File Groups
Database files can be grouped together in file groups for allocation
and administration purposes. No file can be a member of more than one
file group. Log files are never part of a file group. Log space is
managed separately from data space.
There are two types of file groups in SQL Server, Primary and
User-defined. Primary file group contains the primary data file and any
other files not specifically assigned to another file group. All pages
for the system tables are allocated in the primary file group.
User-defined file groups are any file groups specified using the file
group keyword in create database or alter database statement.
One file group in each database operates as the default file group.
When SQL Server allocates a page to a table or index for which no file
group was specified when they were created, the pages are allocated from
default file group. To switch the default file group from one file
group to another file group, it should have db_owner fixed db role.
By default, primary file group is the default file group. User should
have db_owner fixed database role in order to take backup of files and
file groups individually.
Files
Databases have three types of files - Primary data file, Secondary
data file, and Log file. Primary data file is the starting point of the
database and points to the other files in the database.
Every database has one primary data file. We can give any extension for the primary data file but the recommended extension is
.mdf.
Secondary data file is a file other than the primary data file in that
database. Some databases may have multiple secondary data files. Some
databases may not have a single secondary data file. Recommended
extension for secondary data file is
.ndf.
Log files hold all of the log information used to recover the
database. Database must have at least one log file. We can have multiple
log files for one database. The recommended extension for log file is
.ldf.
The location of all the files in a database are recorded in both
master database and the primary file for the database. Most of the time,
the database engine uses the file location from the master database.
Files have two names − Logical and Physical. Logical name is used to
refer to the file in all T-SQL statements. Physical name is the
OS_file_name, it must follow the rules of OS. Data and Log files can be
placed on either FAT or NTFS file systems, but cannot be placed on
compressed file systems. There can be up to 32,767 files in one
database.
Extents
Extents are basic unit in which space is allocated to tables and
indexes. An extent is 8 contiguous pages or 64KB. SQL Server has two
types of extents - Uniform and Mixed. Uniform extents are made up of
only single object. Mixed extents are shared by up to eight objects.
Pages
It is the fundamental unit of data storage in MS SQL Server. The size
of the page is 8KB. The start of each page is 96 byte header used to
store system information such as type of page, amount of free space on
the page and object id of the object owning the page. There are 9 types
of data pages in SQL Server.
- Data − Data rows with all data except text, ntext and image data.
- Index − Index entries.
- Text\Image − Text, image and ntext data.
- GAM − Information about allocated extents.
- SGAM − Information about allocated extents at system level.
- Page Free Space (PFS) − Information about free space available on pages.
- Index Allocation Map (IAM) − Information about extents used by a table or index.
- Bulk Changed Map (BCM) − Information about extents modified by bulk operations since the last backup log statement.
- Differential Changed Map (DCM) − Information about extents that have changed since the last backup database statement.
Log File Architecture
The SQL Server transaction log operates logically as if the
transaction log is a string of log records. Each log record is
identified by Log Sequence Number (LSN). Each log record contains the ID
of the transaction that it belongs to.
Log records for data modifications record either the logical
operation performed or they record the before and after images of the
modified data. The before image is a copy of the data before the
operation is performed; the after image is a copy of the data after the
operation has been performed.
The steps to recover an operation depend on the type of log record −
- Logical operation logged.
- To roll the logical operation forward, the operation is performed again.
- To roll the logical operation back, the reverse logical operation is performed.
- Before and after image logged.
- To roll the operation forward, the after image is applied.
- To roll the operation back, the before image is applied.
Different types of operations are recorded in the transaction log. These operations include −
- The start and end of each transaction.
- Every data modification (insert, update, or delete). This
includes changes by system stored procedures or data definition language
(DDL) statements to any table, including system tables.
- Every extent and page allocation or de allocation.
- Creating or dropping a table or index.
Rollback operations are also logged. Each transaction reserves space
on the transaction log to make sure that enough log space exists to
support a rollback that is caused by either an explicit rollback
statement or if an error is encountered. This reserved space is freed
when the transaction is completed.
The section of the log file from the first log record that must be
present for a successful database-wide rollback to the last-written log
record is called the active part of the log, or the active log. This is
the section of the log required to a full recovery of the database. No
part of the active log can ever be truncated. LSN of this first log
record is known as the minimum recovery LSN (Min LSN).
The SQL Server Database Engine divides each physical log file
internally into a number of virtual log files. Virtual log files have no
fixed size, and there is no fixed number of virtual log files for a
physical log file.
The Database Engine chooses the size of the virtual log files
dynamically while it is creating or extending log files. The Database
Engine tries to maintain a small number of virtual files. The size or
number of virtual log files cannot be configured or set by
administrators. The only time virtual log files affect system
performance is if the physical log files are defined by small size and
growth_increment values.
The size value is the initial size for the log file and the
growth_increment value is the amount of space added to the file every
time new space is required. If the log files grow to a large size
because of many small increments, they will have many virtual log files.
This can slow down database startup and also log backup and restore
operations.
We recommend that you assign log files a size value close to the
final size required, and also have a relatively large growth_increment
value. SQL Server uses a write-ahead log (WAL), which guarantees that no
data modifications are written to disk before the associated log record
is written to disk. This maintains the ACID properties for a
transaction.
MS SQL Server - Management Studio
SQL Server Management Studio is a workstation component\client tool
that will be installed if we select workstation component in
installation steps. This allows you to connect to and manage your SQL
Server from a graphical interface instead of having to use the command
line.
In order to connect to a remote instance of an SQL Server, you will
need this or similar software. It is used by Administrators, Developers,
Testers, etc.
The following methods are used to open SQL Server Management Studio.
First Method
Start → All Programs → MS SQL Server 2012 → SQL Server Management Studio
Second Method
Go to Run and type SQLWB (For 2005 Version) SSMS (For 2008 and Later Versions). Then click Enter.
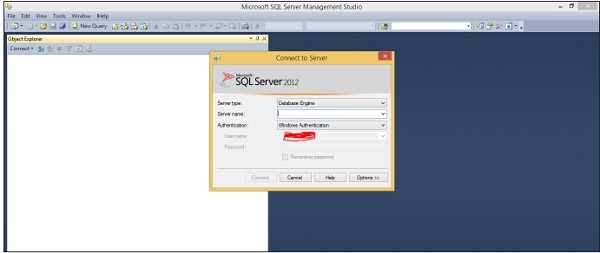
SQL Server Management Studio will be open up as shown in the following snapshot in either of the above method.
MS SQL Server - Login Database
A login is a simple credential for accessing SQL Server. For example,
you provide your username and password when logging on to Windows or
even your e-mail account. This username and password builds up the
credentials. Therefore, credentials are simply a username and a
password.
SQL Server allows four types of logins −
- A login based on Windows credentials.
- A login specific to SQL Server.
- A login mapped to a certificate.
- A login mapped to asymmetric key.
In this tutorial, we are interested in logins based on Windows Credentials and logins specific to SQL Server.
Logins based on Windows credentials allow you to log in to SQL Server
using a Windows username and password. If you need to create your own
credentials (username and password,) you can create a login specific to
SQL Server.
To create, alter, or remove a SQL Server login, you can take one of two approaches −
- Using SQL Server Management Studio.
- Using T-SQL statements.
Following methods are used to create Login −
First Method – Using SQL Server Management Studio
Step 1 − After connecting to SQL Server Instance, expand logins folder as shown in the following snapshot.
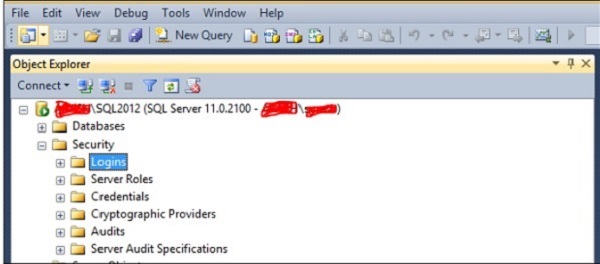 Step 2
 − Right-click on Logins, then click Newlogin and the following screen will open.
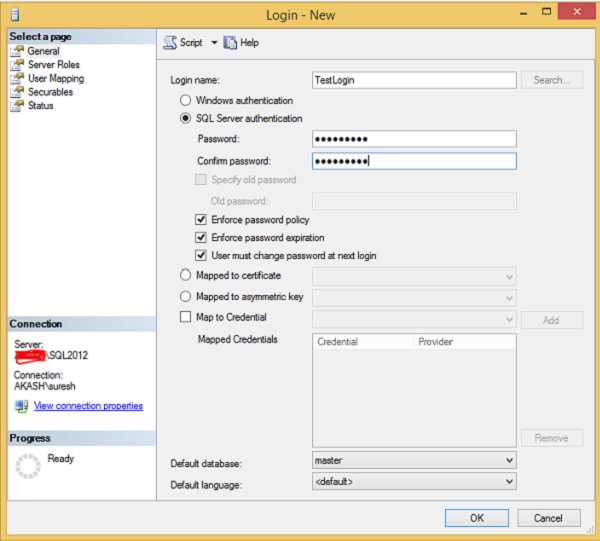 Step 3
 − Fill the Login name, Password and Confirm password columns as shown in the above screen and then click OK.
Login will be created as shown in the following image.

Second Method – Using T-SQL Script
Create login yourloginname with password='yourpassword'
To create login name with TestLogin and password ‘P@ssword’ run below the following query.
Create login TestLogin with password='P@ssword'
MS SQL Server - Create Database
Database is a collection of objects such as table, view, stored procedure, function, trigger, etc.
In MS SQL Server, two types of databases are available.
- System databases
- User Databases
System Databases
System databases are created automatically when we install MS SQL Server. Following is a list of system databases −
- Master
- Model
- MSDB
- Tempdb
- Resource (Introduced in 2005 version)
- Distribution (It’s for Replication feature only)
User Databases
User databases are created by users (Administrators, developers, and testers who have access to create databases).
Following methods are used to create user database.
Method 1 – Using T-SQL Script or Restore Database
Following is the basic syntax for creating database in MS SQL Server.
Create database <yourdatabasename>
OR
Restore Database <Your database name> from disk = '<Backup file location + file name>
Example
To create database called ‘Testdb’, run the following query.
Create database Testdb
OR
Restore database Testdb from disk = 'D:\Backup\Testdb_full_backup.bak'
Note − D:\backup is location of backup file and Testdb_full_backup.bak is the backup file name
Method 2 – Using SQL Server Management Studio
Connect to SQL Server instance and right-click on the databases
folder. Click on new database and the following screen will appear.
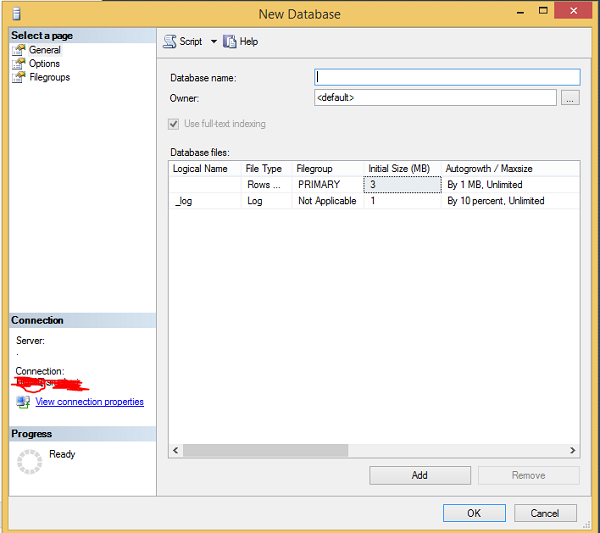
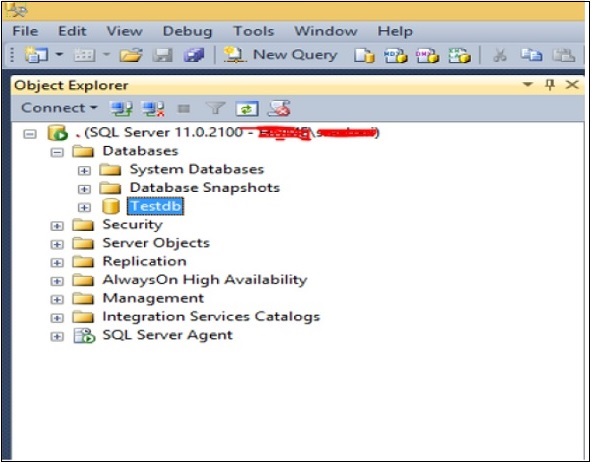
Enter the database name field with your database name (example: to
create database with the name ‘Testdb’) and click OK. Testdb database
will be created as shown in the following snapshot.
MS SQL Server - Select Database
Select your database based on your action before going ahead with any of the following methods.
Method 1 – Using SQL Server Management Studio
Example
To run a query to select backup history on database called ‘msdb’, select the msdb database as shown in the following snapshot.
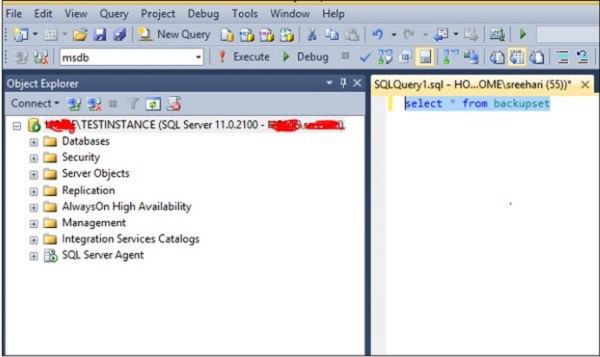
Method 2 – Using T-SQL Script
Use <your database name>
Example
To run your query to select backup history on database called ‘msdb’, select the msdb database by executing the following query.
Exec use msdb
The query will open msdb database. You can execute the following query to select backup history.
Select * from backupset
MS SQL Server - Drop Database
To remove your database from MS SQL Server, use drop database command. Following two methods can be used for this purpose.
Method 1 – Using T-SQL Script
Following is the basic syntax for removing database from MS SQL Server.
Drop database <your database name>
Example
To remove database name ‘Testdb’, run the following query.
Drop database Testdb
Method 2 – Using MS SQL Server Management Studio
Connect to SQL Server and right-click the database you want to
remove. Click delete command and the following screen will appear.
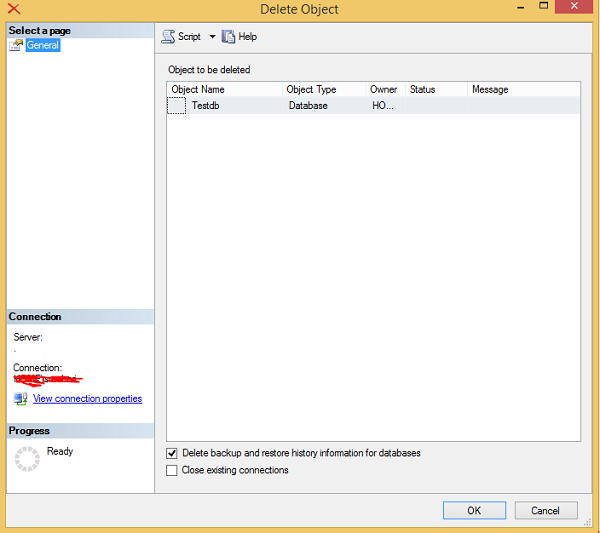
Click OK to remove the database (in this example, the name is Testdb as shown in the above screen) from MS SQL Server.
MS SQL Server - Creating Backups
Backup is a copy of data/database, etc. Backing up MS SQL
Server database is essential for protecting data. MS SQL Server backups
are mainly three types − Full or Database, Differential or Incremental,
and Transactional Log or Log.
Backup database can be done using either of the following two methods.
Method 1 – Using T-SQL
Full Type
Backup database <Your database name> to disk = '<Backup file location + file name>'
Differential Type
Backup database <Your database name> to
   disk = '<Backup file location + file name>' with differential
Log Type
Backup log <Your database name> to disk = '<Backup file location + file name>'
Example
The following command is used for full backup database called
'TestDB' to the location 'D:\' with backup file name 'TestDB_Full.bak'
Backup database TestDB to disk = 'D:\TestDB_Full.bak'
The following command is used for differential backup database called
'TestDB' to the location 'D:\' with backup file name 'TestDB_diff.bak'
Backup database TestDB to disk = 'D:\TestDB_diff.bak' with differential
The following command is used for Log backup database called 'TestDB'
to the location 'D:\' with backup file name 'TestDB_log.trn'
Backup log TestDB to disk = 'D:\TestDB_log.trn'
Method 2 – Using SSMS (SQL SERVER Management Studio)
Step 1 − Connect to database instance named 'TESTINSTANCE' and expand databases folder as shown in the following snapshot.
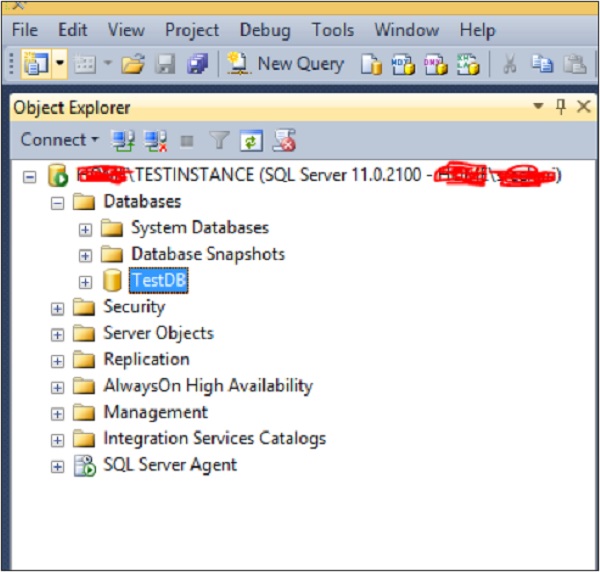 Step 2
 − Right-click on 'TestDB' database and select tasks. Click Backup and the following screen will appear.
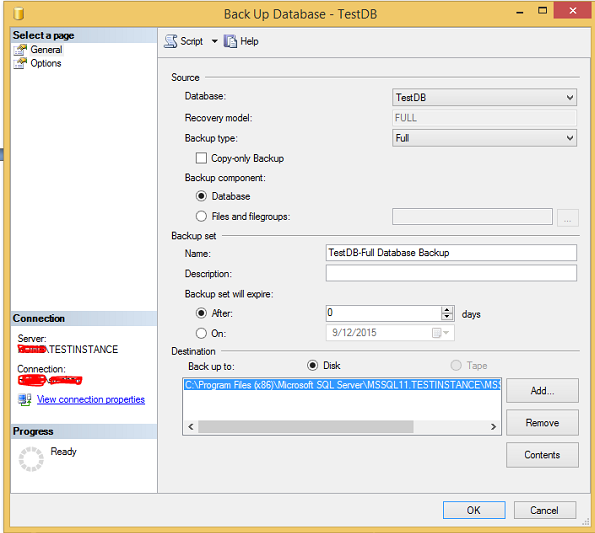 Step 3
 − Select backup type (Full\diff\log) and make sure to
check destination path which is where the backup file will be created.
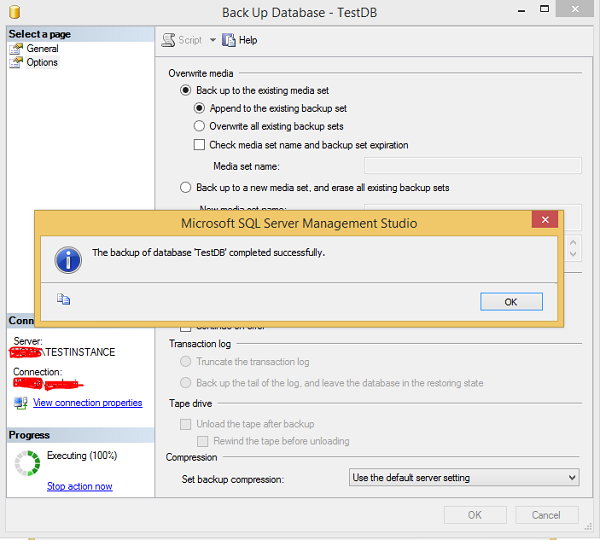
Select options at the top left corner to see the following screen.
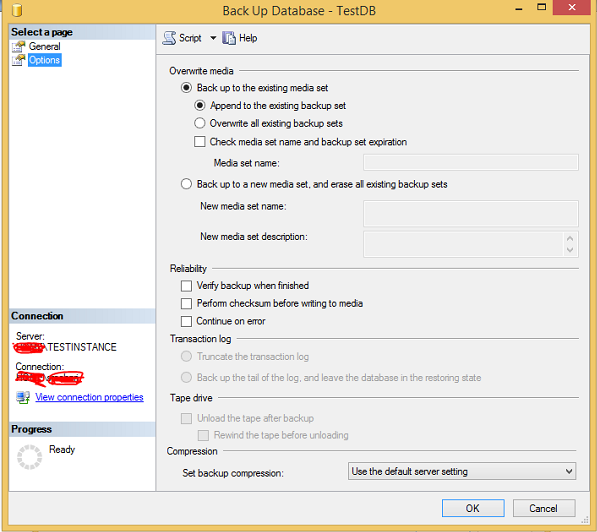 Step 4
 − Click OK to create 'TestDB' database full backup as shown in the following snapshot.

MS SQL Server - Restoring Databases
Restoring is the process of copying data from a backup and
applying logged transactions to the data. Restore is what you do with
backups. Take the backup file and turn it back into a database.
The Restore database option can be done using either of the following two methods.
Method 1 – T-SQL
Syntax
Restore database <Your database name> from disk = '<Backup file location + file name>'
Example
The following command is used to restore database called 'TestDB'
with backup file name 'TestDB_Full.bak' which is available in 'D:\'
location if you are overwriting the existed database.
Restore database TestDB from disk = ' D:\TestDB_Full.bak' with replace
If you are creating a new database with this restore command and
there is no similar path of data, log files in target server, then use
move option like the following command.
Make sure the D:\Data path exists as used in the following command for data and log files.
RESTORE DATABASE TestDB FROM DISK = 'D:\ TestDB_Full.bak' WITH MOVE 'TestDB' TO
   'D:\Data\TestDB.mdf', MOVE 'TestDB_Log' TO 'D:\Data\TestDB_Log.ldf'
Method 2 – SSMS (SQL SERVER Management Studio)
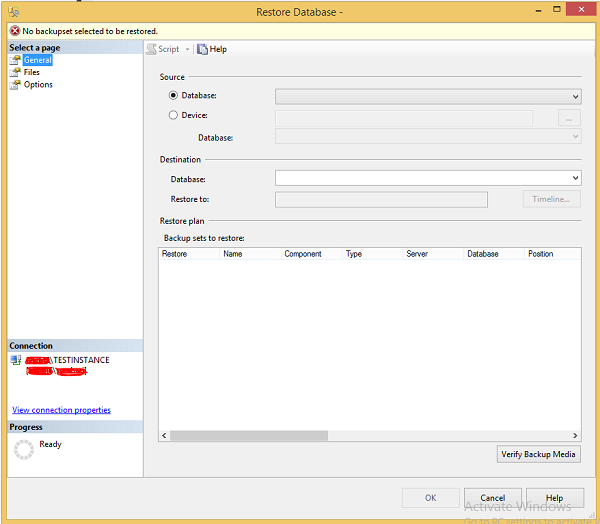
Step 1 − Connect to database instance named 'TESTINSTANCE' and
right-click on databases folder. Click Restore database as shown in the
following snapshot.
 Step 2
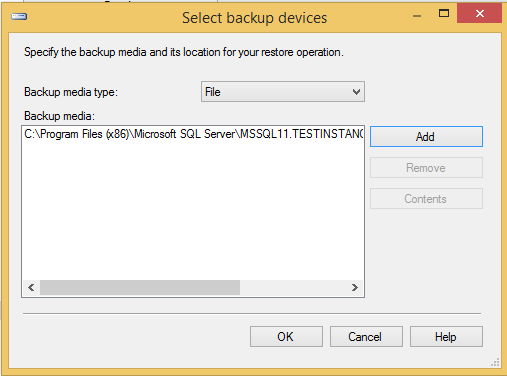
 − Select device radio button and click on ellipse to select the backup file as shown in the following snapshot.
 Step 3
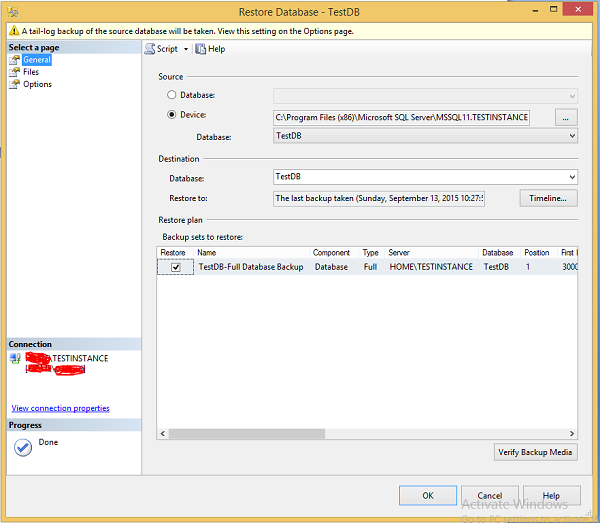
 − Click OK and the following screen pops up.
 Step 4
 − Select Files option which is on the top left corner as shown in the following snapshot.
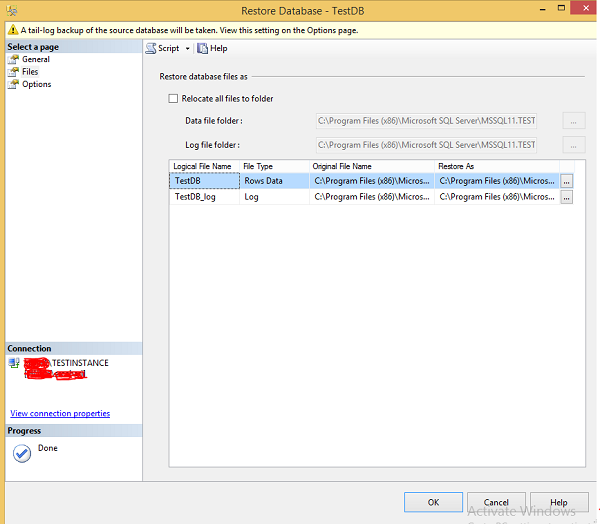 Step 5
 − Select Options which is on the top left corner and click OK to restore 'TestDB' database as shown in the following snapshot.
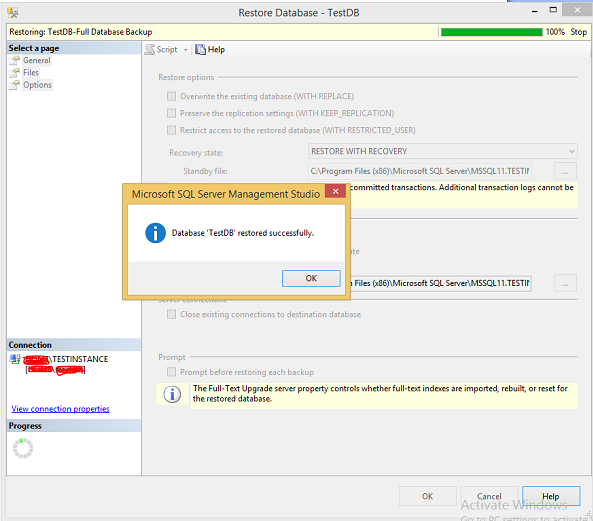
MS SQL Server - Create Users
User refers to an account in MS SQL Server database which is used to access database.
Users can be created using either of the following two methods.
Method 1 – Using T-SQL
Syntax
Create user <username> for login <loginname>
Example
To create user name 'TestUser' with mapping to Login name 'TestLogin' in TestDB database, run the following query.
create user TestUser for login TestLogin
Where 'TestLogin' is the login name which was created as part of the Login creation
Method 2 – Using SSMS (SQL Server Management Studio)
Note − First we have to create Login with any name before creating a user account.
Let’s use Login name called 'TestLogin'.
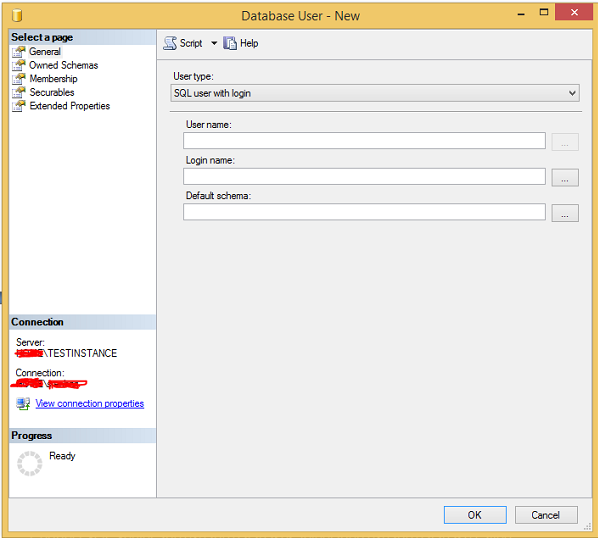
Step 1 − Connect SQL Server and expand databases folder. Then
expand database called 'TestDB' where we are going to create the user
account and expand the security folder. Right-click on users and click
on the new user to see the following screen.
 Step 2
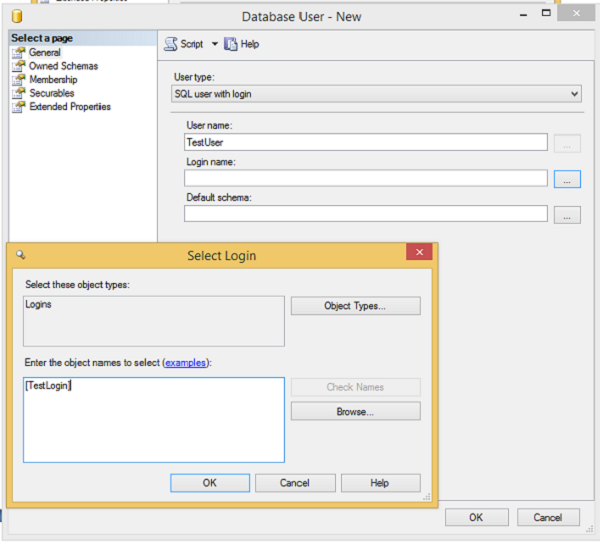
 − Enter 'TestUser' in the user name field and click on
ellipse to select the Login name called 'TestLogin' as shown in the
following snapshot.
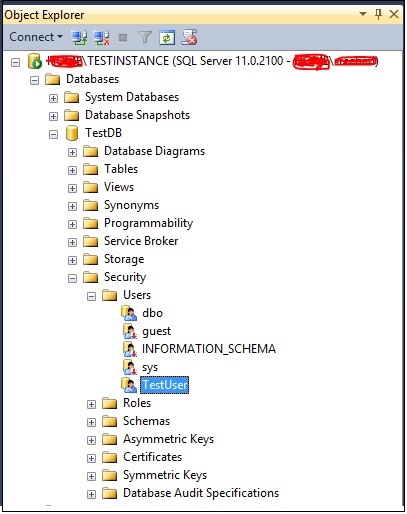
 Step 3
 − Click OK to display login name. Again click OK to create 'TestUser' user as shown in the following snapshot.
MS SQL Server - Assign Permissions
Permissions refer to the rules governing the levels of access
that principals have to securables. You can grant, revoke and deny
permissions in MS SQL Server.
To assign permissions either of the following two methods can be used.
Method 1 – Using T-SQL
Syntax
Use <database name>
Grant <permission name> on <object name> to <username\principle>
Example
To assign select permission to a user called 'TestUser' on object
called 'TestTable' in 'TestDB' database, run the following query.
USE TestDB
GO
Grant select on TestTable to TestUser
Method 2 – Using SSMS (SQL Server Management Studio)
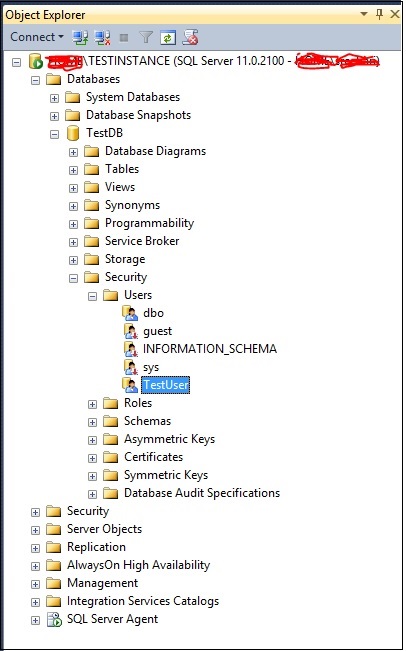
Step 1 − Connect to instance and expand folders as shown in the following snapshot.
 Step 2
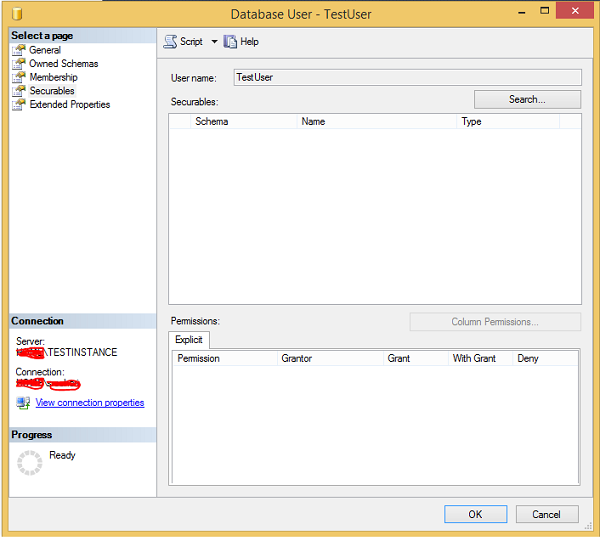
 − Right-click on TestUser and click Properties. The following screen appears.
 Step 3
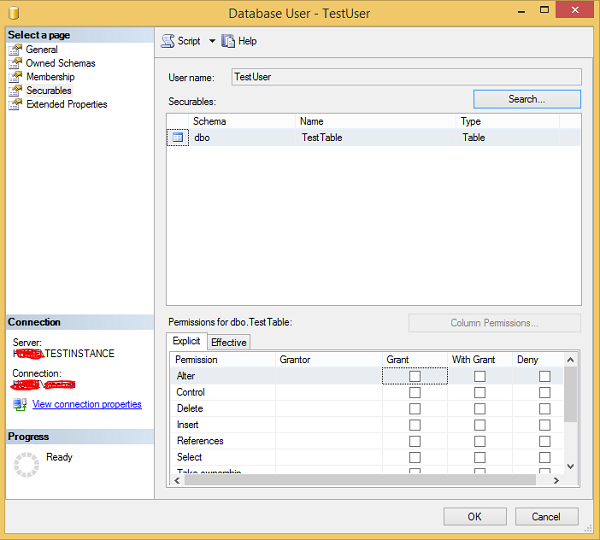
 Click Search and select specific options. Click Object
types, select tables and click browse. Select 'TestTable' and click OK.
The following screen appears.
 Step 4
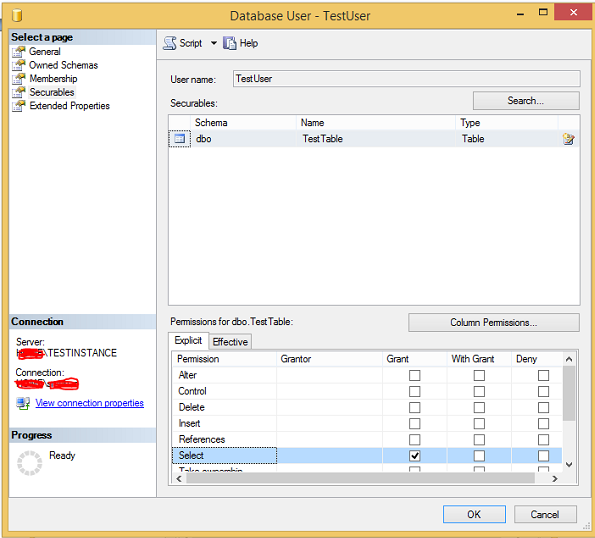
 Select checkbox for Grant column under Select permission and click OK as shown in the above snapshot.
 Step 5
 Select permission on 'TestTable' of TestDB database granted to 'TestUser'. Click OK.
MS SQL Server - Monitor Database
Monitoring refers to checking database status, settings which can be
the owner’s name, file names, file sizes, backup schedules, etc.
SQL Server databases can be monitored mainly through SQL Server
Management Studio or T-SQL, and also can be monitored through various
methods like creating agent jobs and configuring database mail, third
party tools, etc.
Database status can be checked whether it is online or in any other state as shown in the following snapshot.
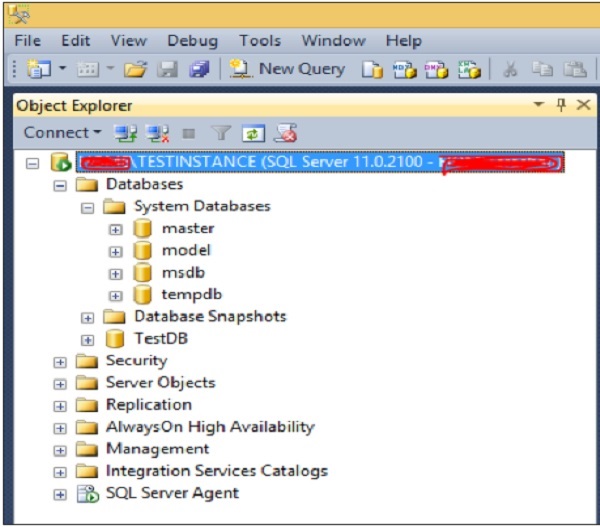
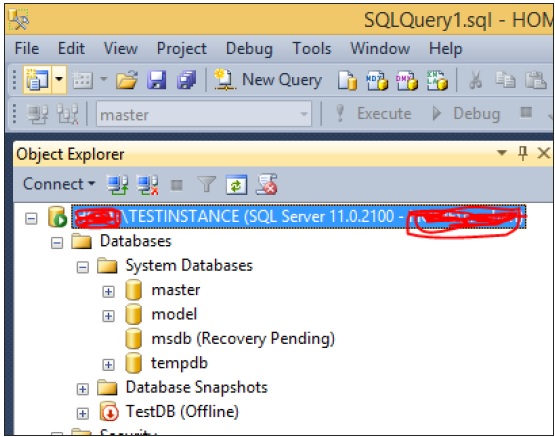
As per the above screen, all databases are in 'Online' status. If any
database is in any other state, then that state will be shown as shown
in the following snapshot.
MS SQL Server - Services
MS SQL Server provides the following two services which is mandatory
for databases creation and maintenance. Other add-on services available
for different purposes are also listed.
- SQL Server
- SQL Server Agent
Other Services
- SQL Server Browser
- SQL Server Full Text Search
- SQL Server Integration Services
- SQL Server Reporting Services
- SQL Server Analysis Services
The above services can be availed using the following method.
Start Services
To start any of the services, either of the following two methods can be used.
Method 1 – Services.msc
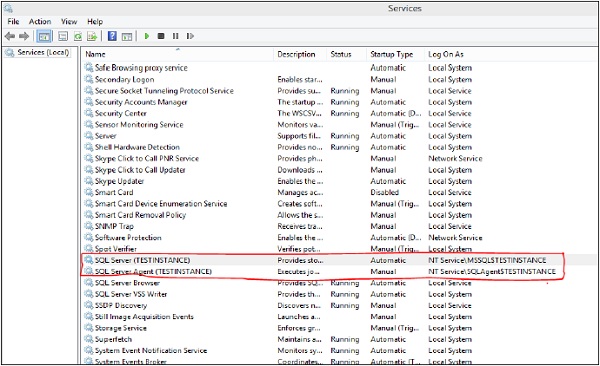
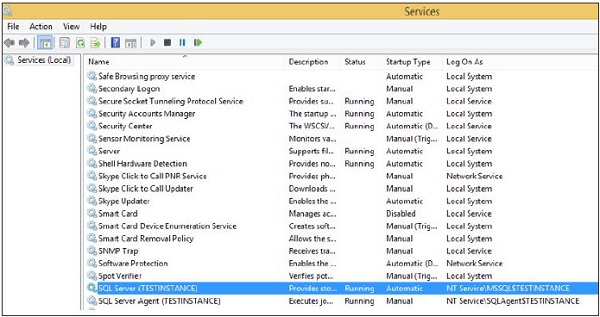
Step 1 − Go to Run, type services.msc and click OK. The following screen appears.
 Step 2
 − To start service, right-click on service, click Start button. Services will start as shown in the following snapshot.
Method 2 – SQL Server Configuration Manager
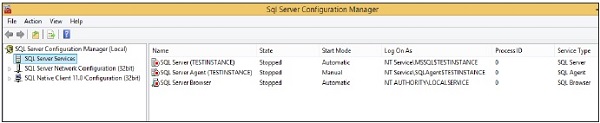
Step 1 − Open configuration manager using the following process.
Start → All Programs → MS SQL Server 2012 → Configuration Tools → SQL Server configuration manager.
 Step 2
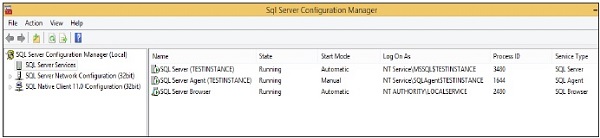
 − Select the service name, right-click and click on start option. Services will start as shown in the following snapshot.
Stop Services
To stop any of the services, either of the following three methods can be used.
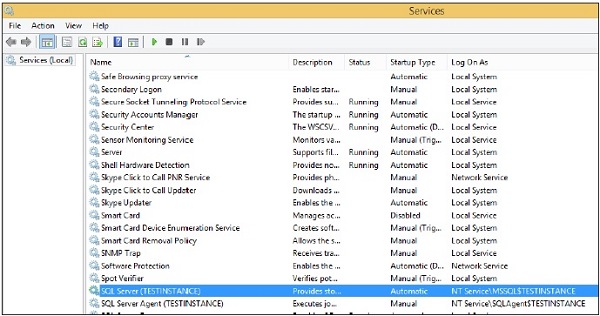
Method 1 - Services.msc
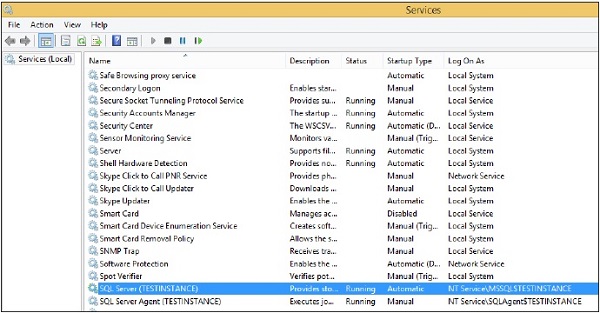
Step 1 − Go to Run, type services.msc and click OK. The following screen appears.
 Step 2
 − To stop services, right-click on service and click
Stop. The selected service will be stopped as shown in the following
snapshot.
Method 2 – SQL Server Configuration Manager
Step 1 − Open configuration manager using the following process.
Start → All Programs → MS SQL Server 2012 → Configuration Tools → SQL Server configuration manager.
 Step 2
 − Select the service name, right-click and click Stop
option. The selected service will be stopped as shown in the following
snapshot.

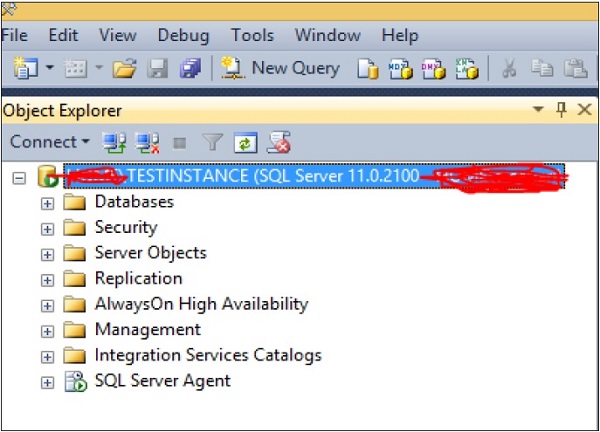
Method 3 – SSMS (SQL Server Management Studio)
Step 1 − Connect to the instance as shown in the following snapshot.
 Step 2
 − Right-click on instance name and click Stop option. The following screen appears.
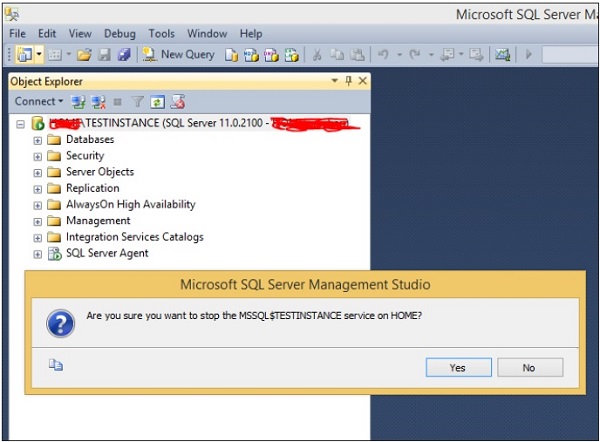 Step 3
 − Click Yes button and the following screen will open.
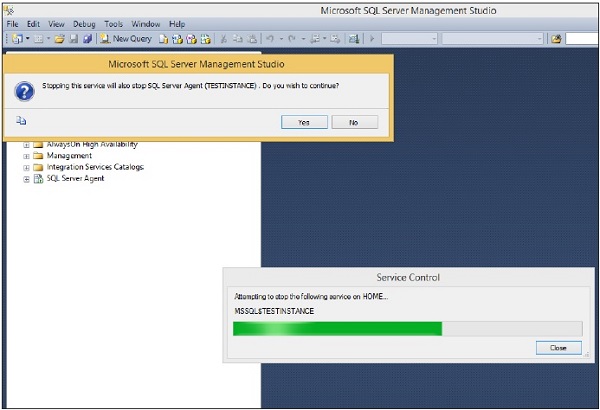 Step 4
 − Click Yes option on the above screen to stop SQL
Server agent service. The services will be stopped as shown in the
following screenshot.
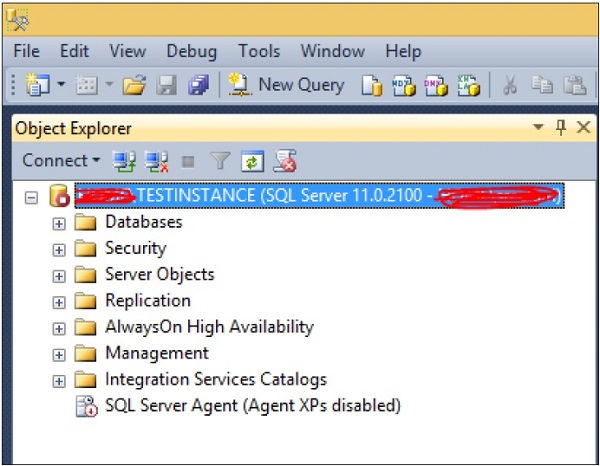
Note
- We cannot use the SQL Server Management Studio method to start
the Services as unable to connect due to services already stopped state.
- We cannot exclude stopping SQL Service agent service while
stopping SQL Server service as SQL Server Agent Service is a dependent
service.
MS SQL Server - HA Technologies
High Availability (HA) is the solution\process\technology to make the
application\database available 24x7 under either planned or un-planned
outages.
Mainly, there are five options in MS SQL Server to achieve\setup high availability solution for the databases.
Replication
The source data will be copied to destination through replication agents (jobs). Object level technology.
Terminology
- Publisher is source server.
- Distributor is optional and stores replicated data for the subscriber.
- Subscriber is the destination server.
Log Shipping
The source data will be copied to destination through Transaction Log backup jobs. Database level technology.
Terminology
- Primary server is source server.
- Secondary server is destination server.
- Monitor server is optional and will be monitored by log shipping status.
Mirroring
The primary data will be copied to secondary through network
transaction basis with the help of mirroring endpoint and port number.
Database level technology.
Terminology
- Principal server is source server.
- Mirror server is destination server.
- Witness server is optional and used to make automatic failover.
Clustering
The data will be stored in shared location which is used by both
primary and secondary servers based on availability of the server.
Instance level technology. Windows Clustering setup is required with
shared storage.
Terminology
- Active node is where SQL Services are running.
- Passive node is where SQL Services are not running.
AlwaysON Availability Groups
The primary data will be copied to secondary through network
transaction basis. Group of database level technology. Windows
Clustering setup is required without shared storage.
Terminology
- Primary replica is source server.
- Secondary replica is destination server.
Following are the steps to configure HA technology (Mirroring and Log
shipping) except Clustering, AlwaysON Availability groups and
Replication.
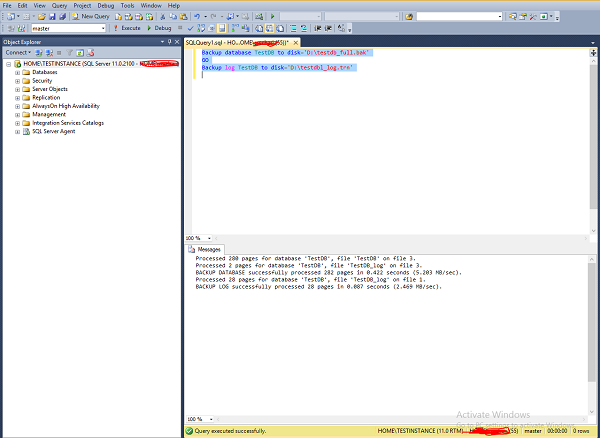
Step 1 − Take one full and one T-log backup of source database.
Example
To configure mirroring\log shipping for the database 'TestDB' in
'TESTINSTANCE' as primary and 'DEVINSTANCE' as secondary SQL Servers,
write the following query to take full and T-log backups on Source
(TESTINSTANCE) server.
Connect to 'TESTINSTANCE' SQL Server and open new query and write the
following code and execute as shown in the following screenshot.
Backup database TestDB to disk = 'D:\testdb_full.bak'
GO
Backup log TestDB to disk = 'D:\testdb_log.trn'
 Step 2
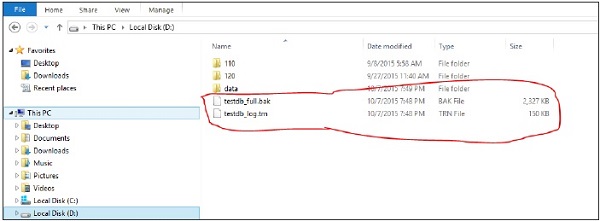
 − Copy the backup files to destination server.
In this case, we have only one physical server and two SQL Servers
Instances installed, hence there is no need to copy, but if two SQL
Server instances are in different physical server, we need to copy the
following two files to any location of the secondary server where
'DEVINSTANCE' instance is installed.
 Step 3
 − Restore the database with backup files in destination server with 'norecovery' option.
Example
Connect to 'DEVINSTANCE' SQL Server and open New Query. Write the
following code to restore the database with the name 'TestDB' which is
the same name of primary database ('TestDB') for database mirroring.
However, we can provide different name for log shipping configuration.
In this case, let’s use 'TestDB' database name. Use 'norecovery' option
for two (full and t-log backup files) restores.
Restore database TestDB from disk = 'D:\TestDB_full.bak'
with move 'TestDB' to 'D:\DATA\TestDB_DR.mdf',
move 'TestDB_log' to 'D:\DATA\TestDB_log_DR.ldf',
norecovery
GO
Restore database TestDB from disk = 'D:\TestDB_log.trn' with norecovery
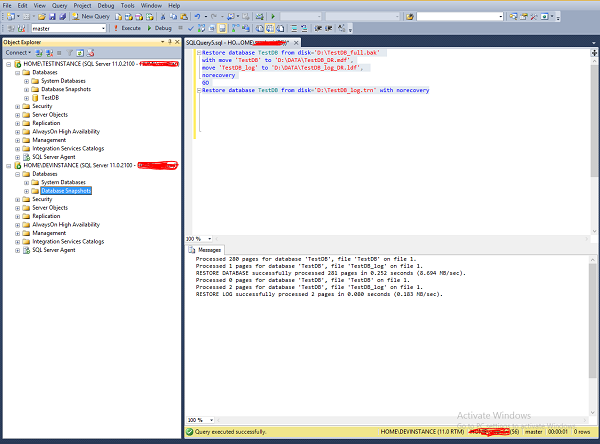
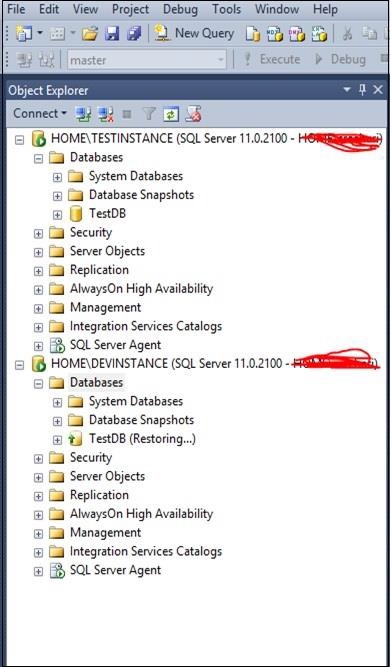
Refresh the databases folder in 'DEVINSTANCE' server to see restored
database 'TestDB' with restoring status as shown in the following
snapshot.
 Step 4
 − Configure the HA (Log shipping, Mirroring) as per your requirement as shown in the following snapshot.
Example
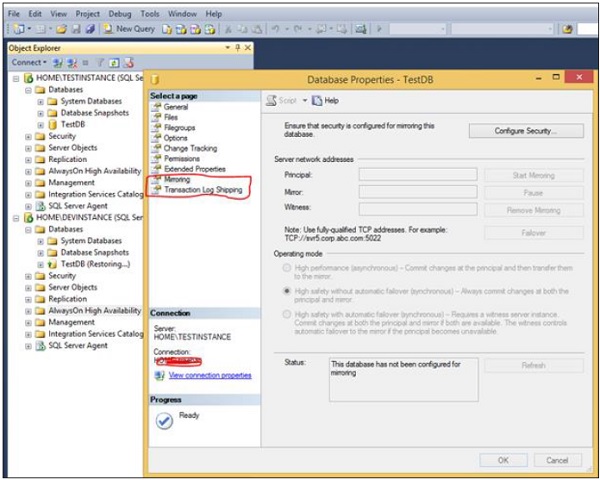
Right-click on 'TestDB' database of 'TESTINSTANCE' SQL Server which
is primary and click Properties. The following screen will appear.
 Step 5
 − Select the option called either 'Mirroring' or
'Transaction Log Shipping' which are in red color box as shown in the
above screen as per your requirement and follow the wizard steps guided
by system itself to complete configuration.
MS SQL Server - Reporting services
Report is a displayable component.
Usage
Report is basically used for two purposes - Company Internal Operations and Company External Operations.
Reporting Services
This is a service which is used to create and publish various kinds of reports.
Following are the three requirements necessary to develop any report.
- Business process
- Layout
- Query\Procedure\View
The BIDS (Business Intelligence Studio till 2008 R2) and SSDT (SQL
Server Data Tools from 2012) are environment to develop reports.
Following are the steps to open BIDS\SSDT environment to develop reports.
Step 1 − Open either BIDS\SSDT based on the version from the
Microsoft SQL Server programs group. The following screen will appear.
In this case, SSDT has opened.
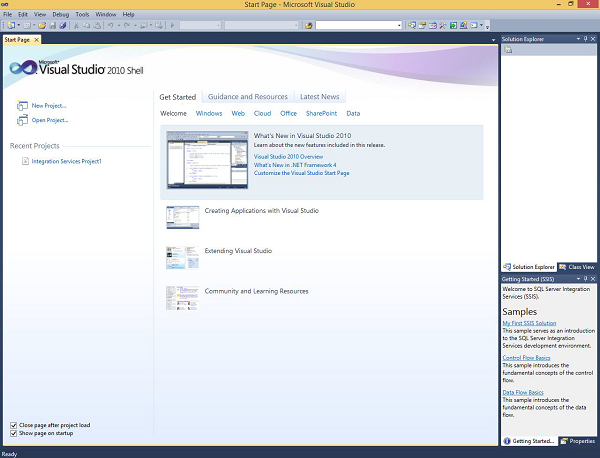 Step 2
 − Go to file at the top left corner in the above screenshot. Click New and select project. The following screen will open.
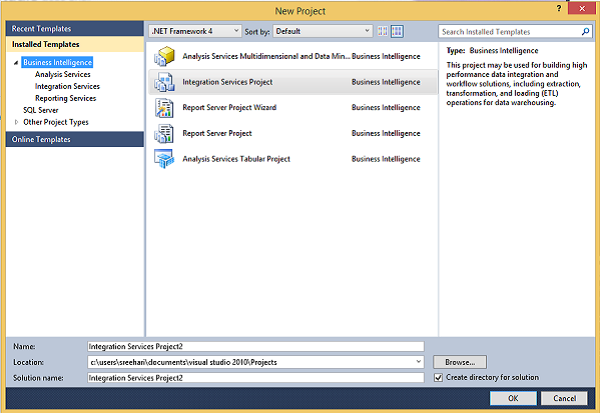 Step 3
 − In the above screen, select reporting services under
business intelligence at the top left corner as shown in the following
screenshot.
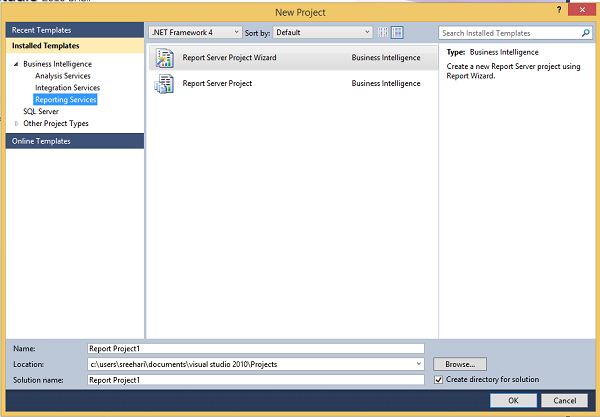 Step 4
 − In the above screen, select either report server
project wizard (it will guide you step by step through wizards) or
report server project (it will be used to select customized settings)
based on your requirement to develop the report.
MS SQL Server - Execution Plans
Execution plan will be generated by Query optimizer with the help of
statistics and Algebrizer\processor tree. It is the result of Query
optimizer and tells how to do\perform your work\requirement.
There are two different execution plans - Estimated and Actual.
Estimated execution plan indicates optimizer view.
Actual execution plan indicates what executed the query and how was it done.
Execution plans are stored in memory called plan cache, hence can be
reused. Each plan is stored once unless optimizer decides parallelism
for the execution of the query.
There are three different formats of execution plans available in SQL Server - Graphical plans, Text plans, and XML plans.
SHOWPLAN is the permission which is required for the user who wants to see the execution plan.
Example 1
Following is the procedure to view the estimated execution plan.
Step 1 − Connect to SQL Server instance. In this case, 'TESTINSTANCE' is the instance name as shown in the following snapshot.
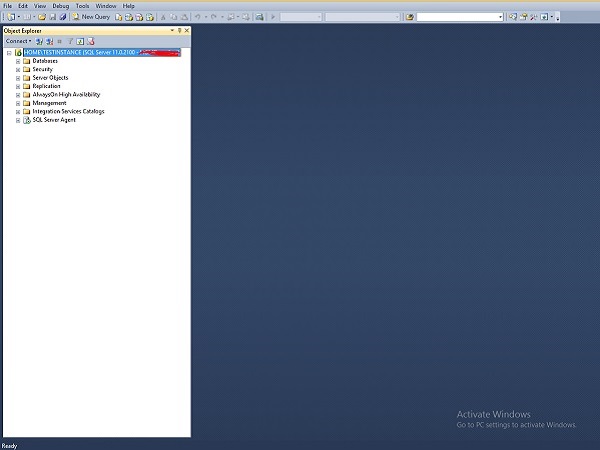 Step 2
 − Click on New Query option on the above screen and
write the following query. Before writing the query, select the database
name. In this case, 'TestDB' is database name.
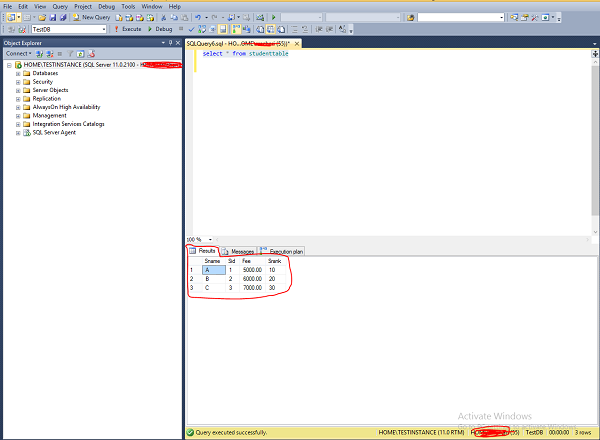
Select * from StudentTable
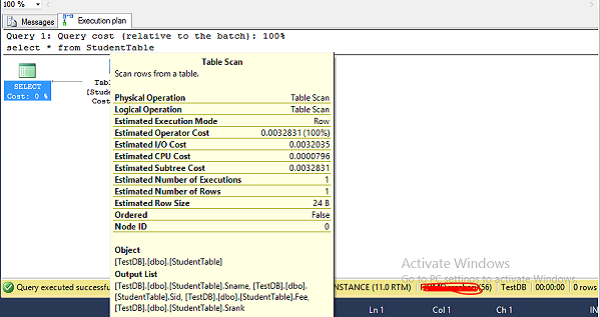
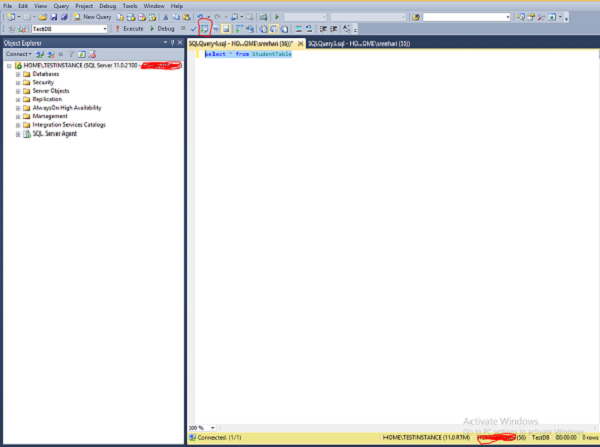 Step 3
 − Click the symbol which is highlighted in red color
box on the above screen to display the estimated execution plan as shown
in the following screenshot.
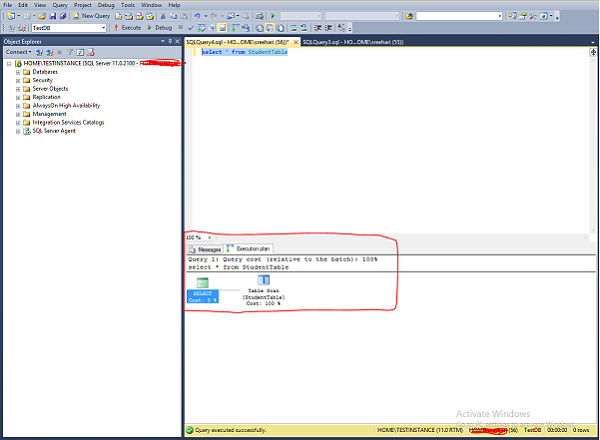 Step 4
 − Place the mouse on table scan which is the second
symbol above the red color box in the above screen to display the
estimated execution plan in detail. The following screenshot appears.
Example 2
Following is the procedure to view the actual execution plan.
Step 1 Connect to SQL Server instance. In this case, 'TESTINSTANCE' is the instance name.
 Step 2
 − Click New Query option seen on the above screen and
write the following query. Before writing the query, select the database
name. In this case, 'TestDB' is database name.
Select * from StudentTable
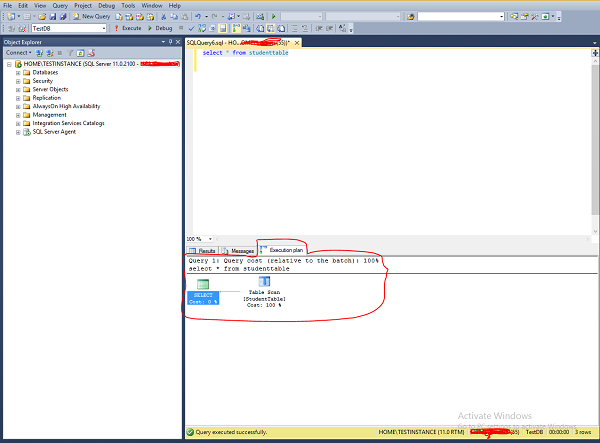
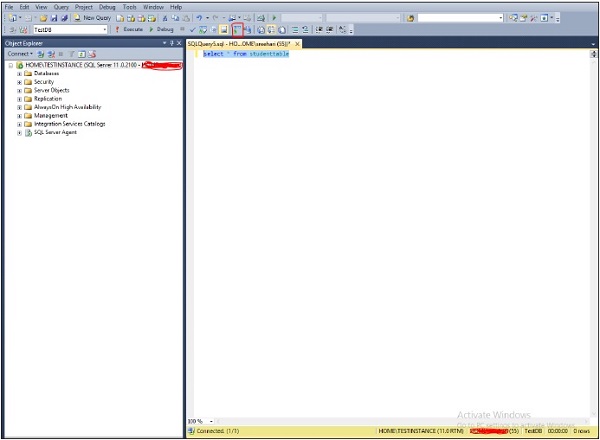 Step 3
 − Click the symbol which is highlighted in red color
box on the above screen and then execute the query to display the actual
execution plan along with the query result as shown in the following
screenshot.
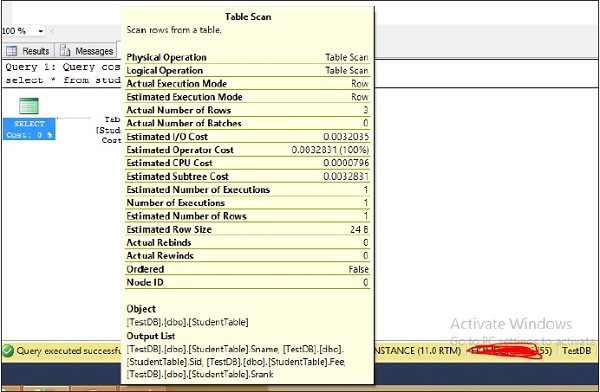
 Step 4
 − Place the mouse on the table scan which is the second
symbol above the red color box on the screen to display the actual
execution plan in detail. The following screenshot appears.
 Step 5
 − Click Results which is on the left top corner on the above screen to get the following screen.
MS SQL Server - Integration Services
This service is used to carry out ETL (Extraction, Transform and Load
data) and admin operations. The BIDS (Business Intelligence Studio till
2008 R2) and SSDT (SQL Server Data Tools from 2012) are the
environments to develop packages.
SSIS Basic Architecture
Solution (Collection of projects) ---> Project (Collection of
packages) ---> Package (Collection of tasks for ETL and admin
operations)
Under Package, the following components are available −
- Control Flow (Containers and Tasks)
- Data Flow (Source, Transformations, Destinations)
- Event Handler (Sending of messages, Emails)
- Package Explorer (A single view for all in package)
- Parameters (User interaction)
Following are the steps to open BIDS\SSDT.
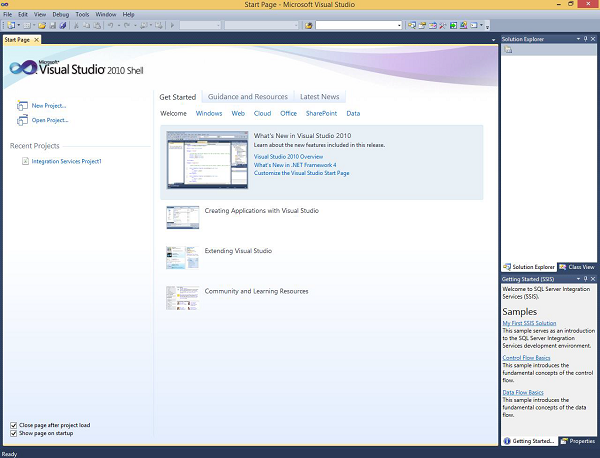
Step 1 − Open either BIDS\SSDT based on the version from the Microsoft SQL Server programs group. The following screen appears.
 Step 2
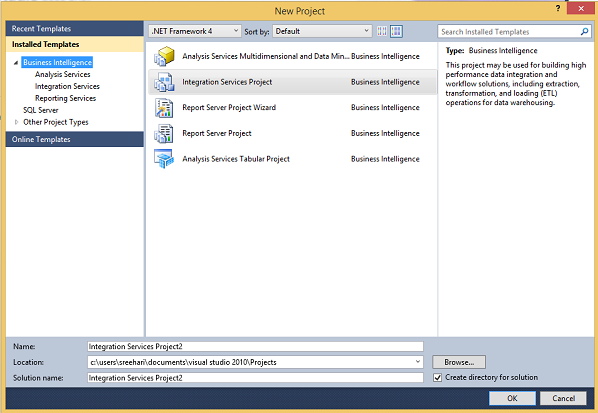
 − The above screen shows SSDT has opened. Go to file at
the top left corner in the above image and click New. Select project
and the following screen opens.
 Step 3
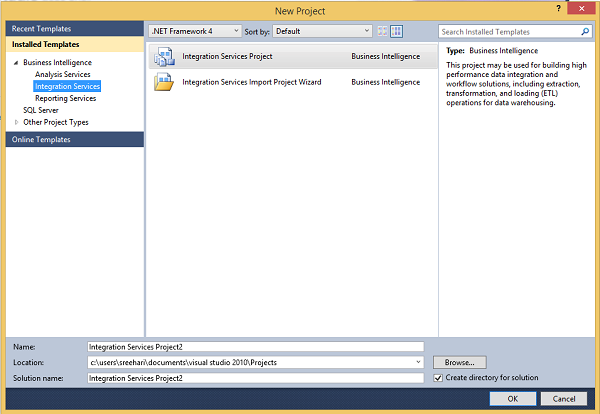
 − Select Integration Services under Business
Intelligence on the top left corner in the above screen to get the
following screen.
 Step 4
 − In the above screen, select either Integration
Services Project or Integration Services Import Project Wizard based on
your requirement to develop\create the package.
MS SQL Server - Analysis Services
This service is used to analyze huge amounts of data and apply to
business decisions. It is also used to create two or multidimensional
business models.
In SQL Server 2000 version, it is called MSAS (Microsoft Analysis Services).
From SQL Server 2005, it is called SSAS (SQL Server Analysis Services).
Modes
There are two modes − Native Mode (SQL Server Mode) and Share Point Mode.
Models
There are two models − Tabular Model (For Team and Personal Analysis) and Multi Dimensions Model (For Corporate Analysis).
The BIDS (Business Intelligence Studio till 2008 R2) and SSDT (SQL
Server Data Tools from 2012) are environments to work with SSAS.
Step 1 − Open either BIDS\SSDT based on the version from the Microsoft SQL Server programs group. The following screen will appear.
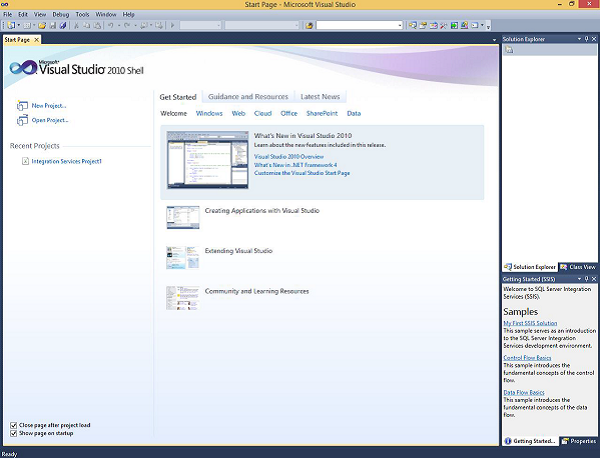 Step 2
 − The above screen shows SSDT has opened. Go to file on
the top left corner in the above image and click New. Select project
and the following screen opens.
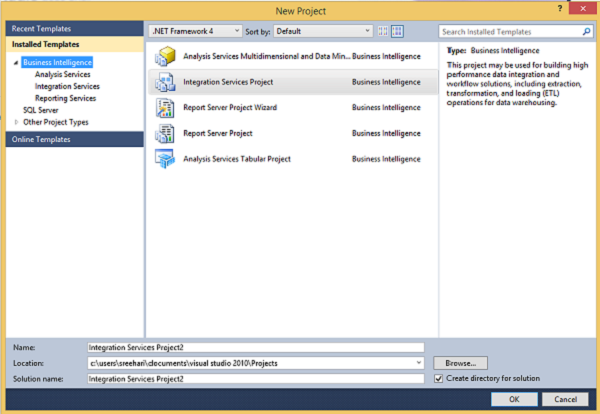 Step 3
 − Select Analysis Services in the above screen under
Business Intelligence as seen on the top left corner. The following
screen pops up.
Step 4 − In the above screen, select any one option from the
listed five options based on your requirement to work with Analysis
services.
 SQL Server (starting with 2008)
